If your Python app only needs one prompt in and one answer out, the Responses API is often the simpler place to start. The Realtime API is for a different kind of product. It keeps a live session open so your app can stream text or audio, react to partial output, and update the session while the conversation is still moving.
That makes it useful for voice assistants, live support tools, phone agents, and backends that should stay attached to a conversation instead of rebuilding context on every turn. OpenAI’s current gpt-realtime model is a general-availability realtime model with text and audio output, plus text, audio, and image input.
This tutorial shows how to connect from Python over WebSocket, send text and audio events, add server-side tools, mint ephemeral keys for browser clients, and decide when WebRTC is the better transport.
What you’ll learn:
- When a Python backend should use WebSocket instead of WebRTC
- How to open a Realtime session and stream text output
- How to send audio chunks over the socket
- How to keep tools and private business logic on the server
- How to mint short-lived client secrets for browser apps
Time required: 40-55 minutes
Difficulty level: Intermediate
Prerequisites
Before you start, make sure you have:
- Python 3.11 or newer
- An OpenAI API key stored on your backend
- Basic comfort with JSON events and HTTP APIs
- A
.wavsample file if you want to test audio input
Tools used in this guide:
websocket-clientfor the live socket connectionpython-dotenvfor local environment variablesnumpyandsoundfilefor audio encodinghttpxandFastAPIfor the token-minting example
If you want a cleaner Python setup, pair this tutorial with our uv guide.
Step 1: Choose the Right Transport First
The OpenAI Realtime API supports three connection styles: WebRTC, WebSocket, and SIP. The official docs make the split pretty clear.
Use WebSocket when your Python service is connecting from a secure backend. This is the recommended path for server-to-server applications, because your standard API key stays on infrastructure you control. It is also the lowest-level interface, which means you get full control over JSON events, audio buffering, logging, and tool execution.
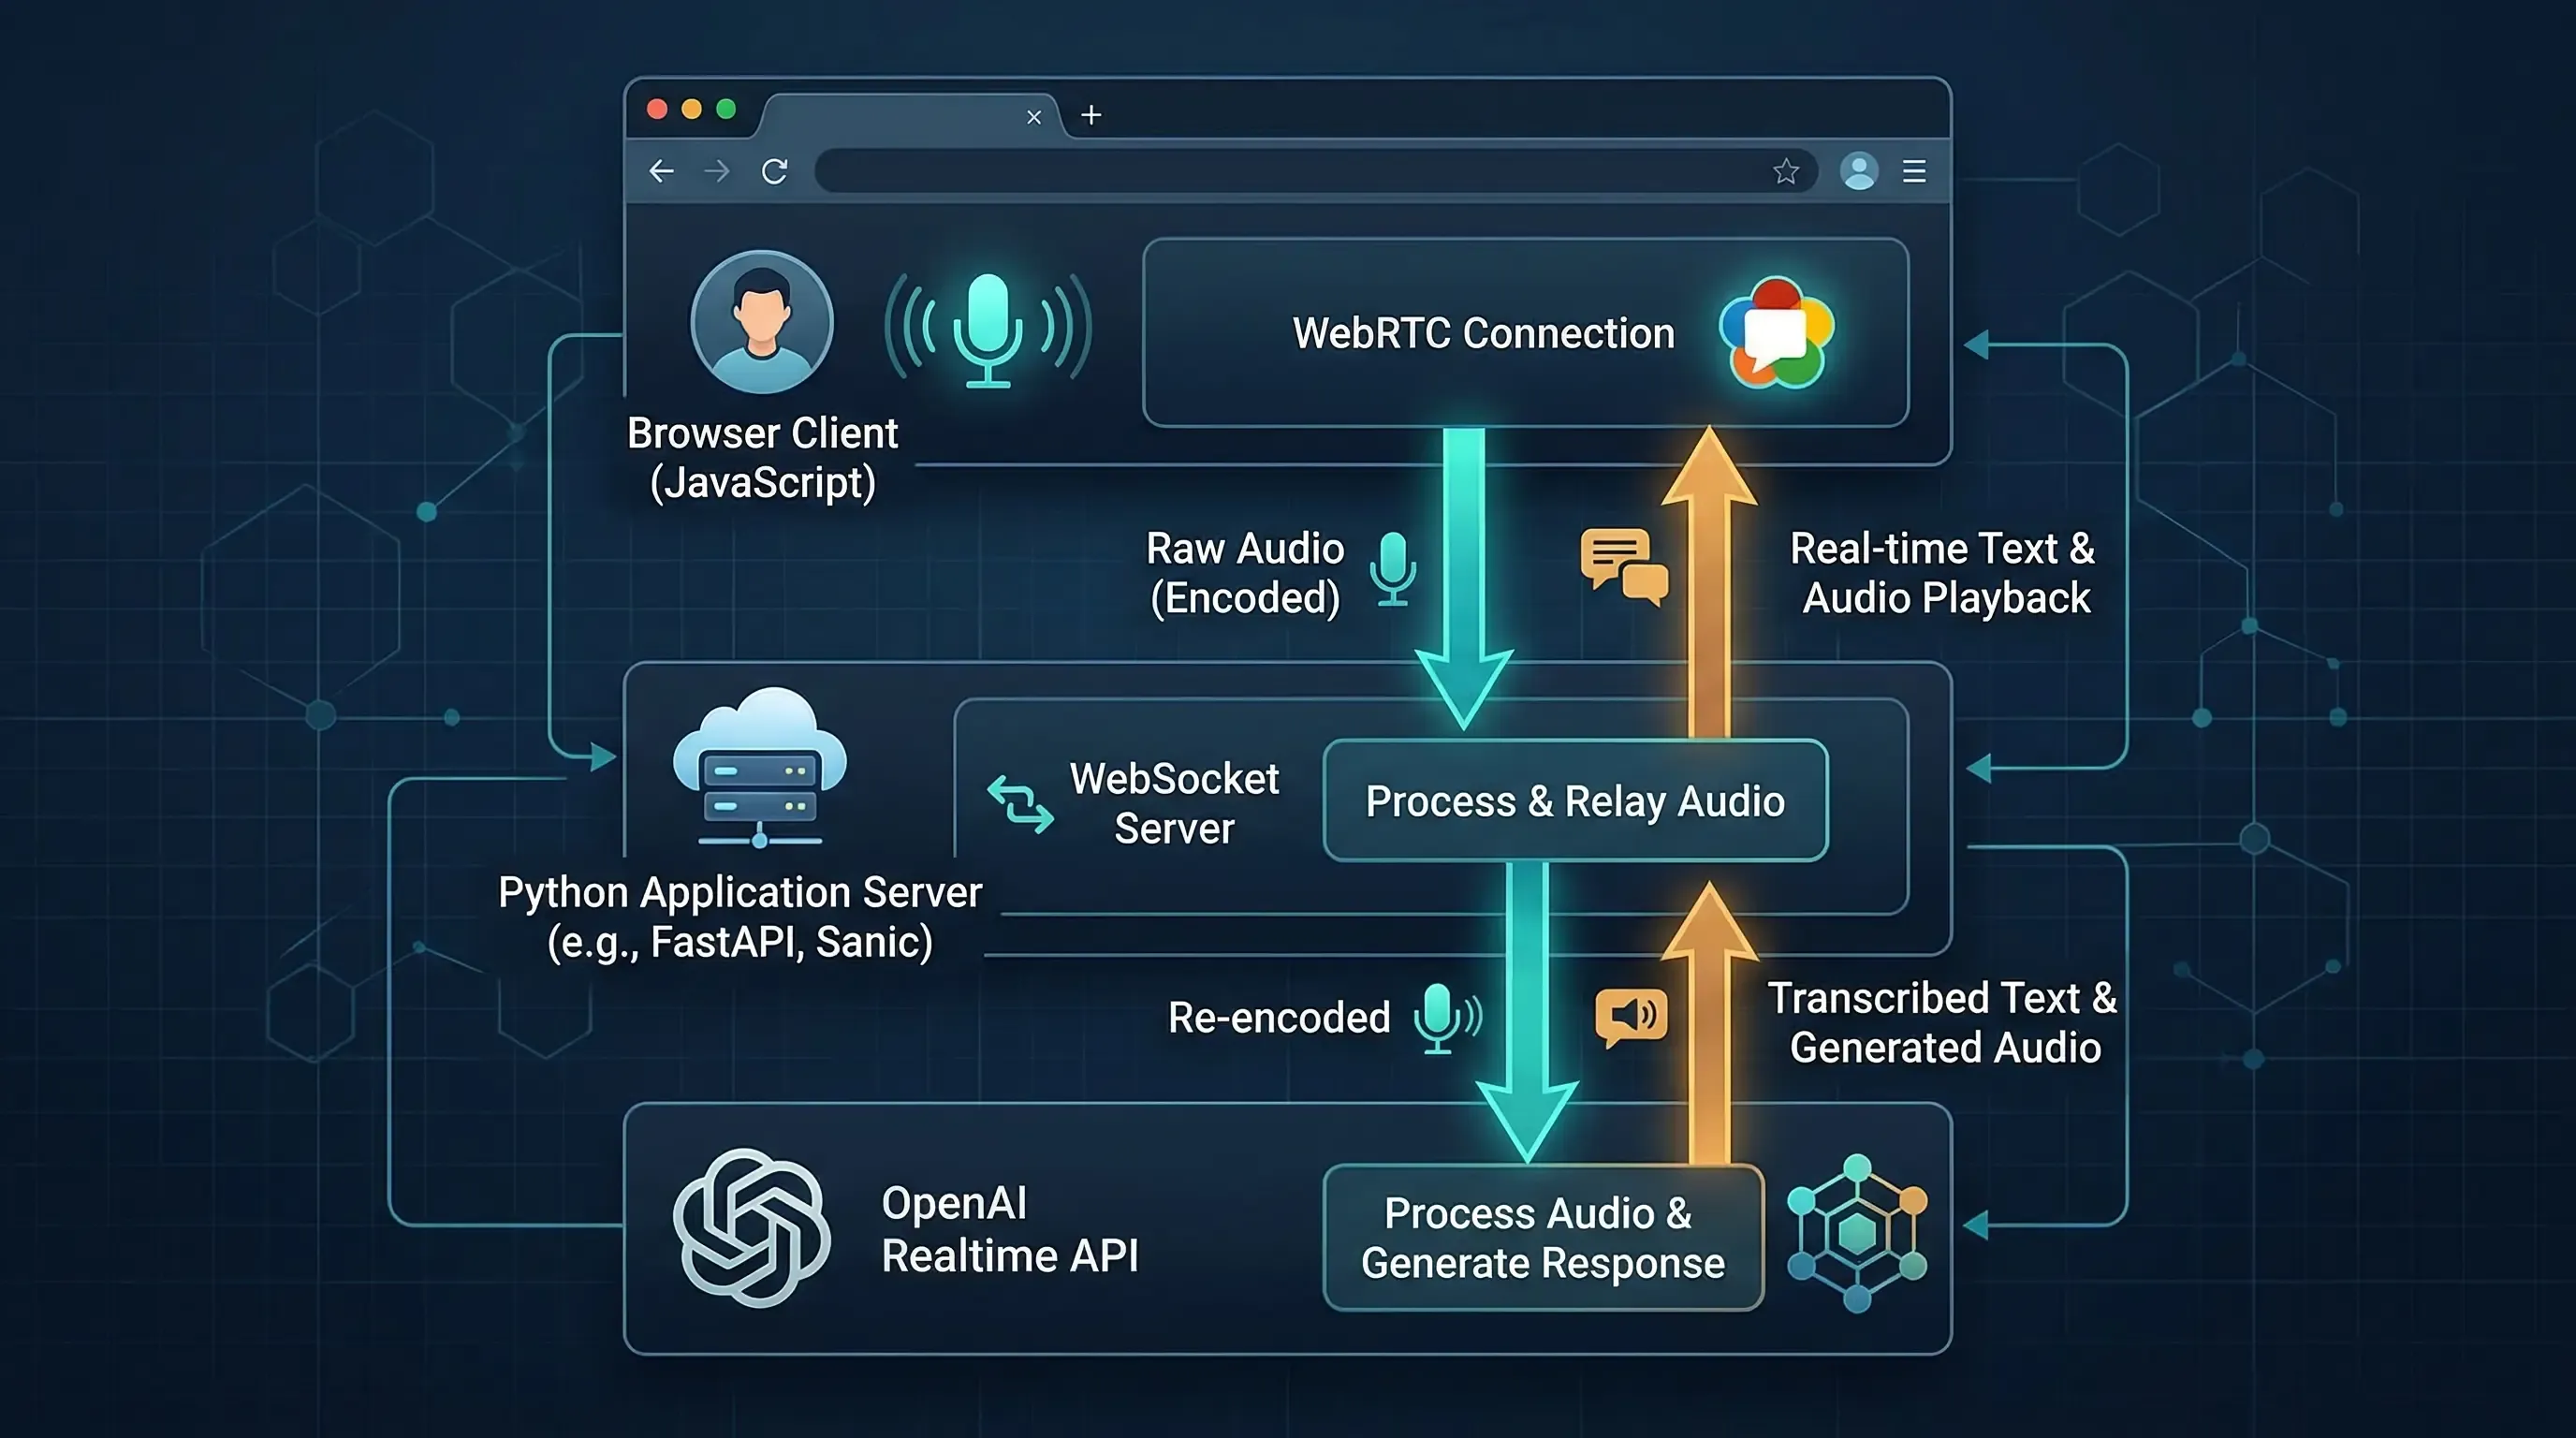
Use WebRTC when the user-facing client is a browser or mobile app. OpenAI recommends WebRTC over WebSockets for those clients because media handling is more reliable under real network conditions. In plain terms, if the microphone and speaker live in the browser, let WebRTC carry that media.
Here is the practical version:
| Scenario | Better fit | Why |
|---|---|---|
| Python backend, worker, or internal service | WebSocket | Standard API key stays server-side and event handling is simple |
| Browser voice UI | WebRTC | Better media transport and client-side device handling |
| Browser voice UI with private tools | WebRTC + sideband WebSocket | The browser handles media, your server handles tools and control |
| Telephony | SIP or SIP + sideband WebSocket | Designed for call workflows |
Two more limits are worth knowing before you write code:
- A Realtime session can last up to 60 minutes.
gpt-realtimecurrently offers a 32,000-token context window and up to 4,096 output tokens.
That is enough for a long voice interaction, but it is not infinite. You still need to think about how long you keep a session alive.
Step 2: Install the Python Packages
For the text, audio, and browser-token examples in this article, start with these dependencies:
uv init realtime-python-demo
cd realtime-python-demo

uv add websocket-client python-dotenv numpy soundfile httpx fastapi uvicorn
If you prefer pip, this is the equivalent:
python -m venv .venv
source .venv/bin/activate
pip install websocket-client python-dotenv numpy soundfile httpx fastapi uvicorn
Create a local .env file:
OPENAI_API_KEY=your_server_side_key_here
A quick note on package choices:
websocket-clientkeeps the WebSocket example short and readable.numpyplussoundfilemake it easy to convert audio into PCM16 bytes.httpxis a clean way to call the client secret endpoint from Python.FastAPIis only needed if you want the browser-token route from Step 6.
Step 3: Open a WebSocket Session and Stream Text Output
The WebSocket guide shows the basic connection URL: wss://api.openai.com/v1/realtime?model=gpt-realtime. After the socket opens, you send JSON events such as session.update, conversation.item.create, and response.create. The server then returns lifecycle events like response.output_text.delta and response.done.
A minimal text-first script looks like this:
import json
import os

from dotenv import load_dotenv
from websocket import WebSocketApp

load_dotenv()

URL = "wss://api.openai.com/v1/realtime?model=gpt-realtime"


def on_open(ws: WebSocketApp) -> None:
    print("Connected to Realtime API.")

    ws.send(
        json.dumps(
            {
                "type": "session.update",
                "session": {
                    "type": "realtime",
                    "model": "gpt-realtime",
                    "output_modalities": ["text"],
                    "instructions": (
                        "You are a concise Python assistant. "
                        "Answer in short paragraphs and end with one practical next step."
                    ),
                },
            }
        )
    )

    ws.send(
        json.dumps(
            {
                "type": "conversation.item.create",
                "item": {
                    "type": "message",
                    "role": "user",
                    "content": [
                        {
                            "type": "input_text",
                            "text": (
                                "Explain when a Python backend should use WebSocket "
                                "instead of WebRTC for the OpenAI Realtime API."
                            ),
                        }
                    ],
                },
            }
        )
    )

    ws.send(
        json.dumps(
            {
                "type": "response.create",
                "response": {
                    "output_modalities": ["text"],
                },
            }
        )
    )


def on_message(ws: WebSocketApp, message: str) -> None:
    event = json.loads(message)
    event_type = event.get("type")

    if event_type == "response.output_text.delta":
        print(event["delta"], end="", flush=True)
    elif event_type == "response.done":
        print("\n\nResponse complete.")
        ws.close()
    elif event_type == "error":
        print("\nRealtime error:", event)


def on_error(ws: WebSocketApp, error: Exception) -> None:
    print("WebSocket error:", error)


def on_close(ws: WebSocketApp, close_status_code, close_msg) -> None:
    print(f"Socket closed: {close_status_code} {close_msg}")


ws = WebSocketApp(
    URL,
    header=[f"Authorization: Bearer {os.environ['OPENAI_API_KEY']}"],
    on_open=on_open,
    on_message=on_message,
    on_error=on_error,
    on_close=on_close,
)

ws.run_forever()
When you run it, the sequence is straightforward:
session.updatedefines how this session should behave.conversation.item.createadds a user message to the current conversation.response.createtells the model to answer.response.output_text.deltastreams the answer as it is generated.response.donemarks the final server event for that response.
This split is useful in practice. If you want a typing effect or a live terminal display, consume the delta events. If you only care about the finished answer, ignore the deltas and read response.done.
A common first mistake is forgetting that conversation.item.create only adds input. The model does not speak until you send response.create, unless your session mode is set up to auto-generate responses from voice input.
Step 4: Stream Audio When You Need Voice Input
This is where Realtime starts to feel different from normal request-response APIs. The conversations guide points out that WebSocket audio handling is manual. You send Base64-encoded audio bytes into the input buffer yourself. Each chunk must stay under 15 MB.
If you are doing voice work from Python, start with a file-based test before you reach for a microphone stream. It is easier to debug and easier to replay.
import base64
import json

import numpy as np
import soundfile as sf
from websocket import WebSocketApp


def float32_to_pcm16(audio: np.ndarray) -> bytes:
    clipped = np.clip(audio, -1, 1)
    return (clipped * 32767).astype("<i2").tobytes()


def encode_audio_file(path: str) -> str:
    data, sample_rate = sf.read(path, dtype="float32")
    channel_data = data[:, 0] if data.ndim > 1 else data
    pcm16_bytes = float32_to_pcm16(channel_data)
    return base64.b64encode(pcm16_bytes).decode("utf-8")


def send_audio_file(ws: WebSocketApp, path: str) -> None:
    payload = encode_audio_file(path)

    ws.send(
        json.dumps(
            {
                "type": "input_audio_buffer.append",
                "audio": payload,
            }
        )
    )

    ws.send(json.dumps({"type": "input_audio_buffer.commit"}))
    ws.send(json.dumps({"type": "response.create"}))
A few details matter here:
input_audio_buffer.appendsends raw audio into the current input buffer.input_audio_buffer.committurns that buffer into a user input item.response.createasks the model to respond, which you need when VAD is disabled.- If VAD is enabled, the server can decide when speech has started and stopped, and may create responses automatically.
The docs also mention another option: instead of chunking audio into the buffer, you can create a full conversation item with input_audio content. That is useful when you already have a fully recorded clip and want the message to arrive as one unit.

One more production detail is easy to miss. If you need real audio bytes from the model over WebSocket, listen for response.output_audio.delta. The final response.done event contains transcriptions and metadata, not the raw audio chunks themselves.
Step 5: Keep Tools and Private Logic on the Server
The server-side controls guide makes an important recommendation: keep tool use and business logic on your application server. That rule matters even more for voice applications, because they often need CRM lookups, billing checks, policy gates, or moderation steps that should never live in browser code.
If your whole product is backend-driven, this is easy. Your Python service owns the WebSocket connection, registers tools, handles function calls, and returns the model output to whatever frontend you already have.
If your frontend uses WebRTC, the best pattern is usually a sideband connection:
- The browser owns the live audio stream over WebRTC.
- Your server opens a second connection to the same Realtime session.
- The server updates instructions, answers tool calls, and keeps private logic off the client.
At the session level, tool configuration looks like this:
tools_event = {
    "type": "session.update",
    "session": {
        "tools": [
            {
                "type": "function",
                "name": "lookup_order_status",
                "description": "Return shipping status for an order id.",
                "parameters": {
                    "type": "object",
                    "properties": {
                        "order_id": {
                            "type": "string",
                            "description": "The customer's order number.",
                        }
                    },
                    "required": ["order_id"],
                },
            }
        ],
        "tool_choice": "auto",
    },
}
That does not execute the function by itself. It only tells the model which tools exist. Your Python application still needs to watch the conversation or response events, detect when the model wants a function call, run the actual code, and post the tool result back into the session.
This is also where sideband control shines. The browser can stay focused on media. The Python server can stay focused on business logic.
Step 6: Mint Ephemeral Tokens for Browser Clients From Python
The WebRTC guide recommends ephemeral client secrets when a browser or mobile client connects directly to Realtime. The API reference says these tokens expire after one minute, and they are meant for client environments. Your standard API key should remain on the server.
Here is the Python equivalent of the token-minting flow shown in the docs:
import os

import httpx
from dotenv import load_dotenv
from fastapi import FastAPI, HTTPException

load_dotenv()

app = FastAPI()
OPENAI_API_KEY = os.environ["OPENAI_API_KEY"]


@app.get("/token")
async def create_realtime_token():
    payload = {
        "session": {
            "type": "realtime",
            "model": "gpt-realtime",
            "audio": {
                "output": {
                    "voice": "marin",
                }
            },
        }
    }

    async with httpx.AsyncClient(timeout=30.0) as client:
        response = await client.post(
            "https://api.openai.com/v1/realtime/client_secrets",
            headers={
                "Authorization": f"Bearer {OPENAI_API_KEY}",
                "Content-Type": "application/json",
            },
            json=payload,
        )

    try:
        response.raise_for_status()
    except httpx.HTTPStatusError as exc:
        raise HTTPException(
            status_code=exc.response.status_code,
            detail=exc.response.text,
        ) from exc

    return response.json()
Start it like this:
uvicorn token_server:app --reload
Your browser can then call /token, receive a short-lived client_secret, and use that to establish a WebRTC session directly with OpenAI. If you want the unified WebRTC flow instead, your backend can also create the session by POSTing SDP to /v1/realtime/calls.
The good design rule is simple:
- Standard API key: backend only
- Ephemeral client secret: browser or mobile client
- Private tools and policy logic: backend only
Advanced Tips
Now that the basic flow works, these three habits will save you time later.
Tip 1: Start with text-only responses while debugging
The docs note that sessions can mix text and audio. That is useful, but it can make debugging noisy. Start with output_modalities: ["text"] until your event flow is solid. Once the socket lifecycle feels predictable, switch on audio.
Tip 2: Treat session state as part of your architecture
Realtime is stateful. That is the whole point. The session holds configuration, the conversation keeps prior items, and each new response can build on earlier turns. This is great for voice UX, but it also means reconnect behavior, session renewal, and context trimming are part of the design, not cleanup work.
Tip 3: Watch costs on long sessions
OpenAI’s cost guide says the whole conversation is considered for later responses, which means turns get more expensive as the session grows. The same guide also gives concrete audio token math: user audio is billed at 1 token per 100 ms, and assistant audio at 1 token per 50 ms. If you keep a session open for a long support call, track that growth early instead of discovering it in billing later.
Common Problems and Solutions
Problem 1: The browser gets a 401 or a failed handshake
Solution: Do not send your standard API key to the browser. Use your backend to mint a client secret, then connect the browser over WebRTC or another approved client flow.
Problem 2: Audio uploads but the model never answers
Solution: Check your VAD setting. If VAD is off, you must send both input_audio_buffer.commit and response.create. Appending audio alone is not enough.
Problem 3: You cannot switch voices midway through a call
Solution: Set the voice early. The conversations guide notes that once the model has already produced audio in a session, the voice cannot be changed for that session.
Problem 4: The final event has text, but no playable audio bytes
Solution: Listen for response.output_audio.delta. The docs are explicit here: response.done and response.output_audio.done do not carry the full audio bytes you need for playback or file output.
Conclusion
The Python story for OpenAI Realtime is better than it first looks. Once you understand the event model, a backend WebSocket client is not complicated. It is just explicit. You open a live connection, configure a session, add items to the conversation, and tell the model when to respond.
That makes WebSocket a strong choice for secure Python backends, worker services, and any system that needs tight control over tools or session state. When the user interface lives in the browser, WebRTC is still the better transport for media, with your Python server acting as the place where secrets, tools, and policy checks stay private.
If you build this in stages, text first, audio second, browser tokens third, you will avoid most of the pain people run into with realtime systems.
For related reading, see our guides on FastAPI WebSockets, FastAPI async patterns, and Python automation libraries for AI workflows.
Sources:
Discussion
Leave a comment
No comments yet
Be the first to start the conversation.